|
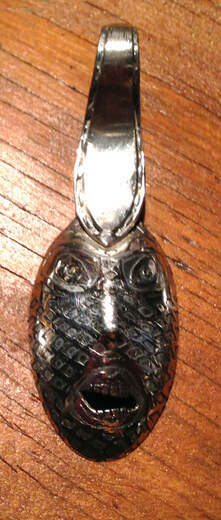
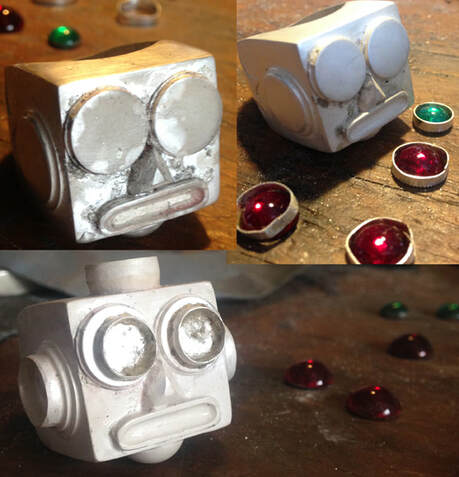
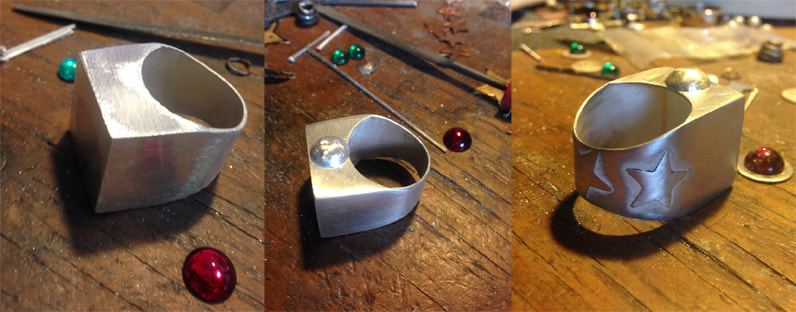
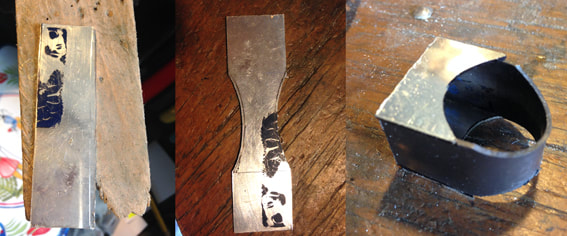
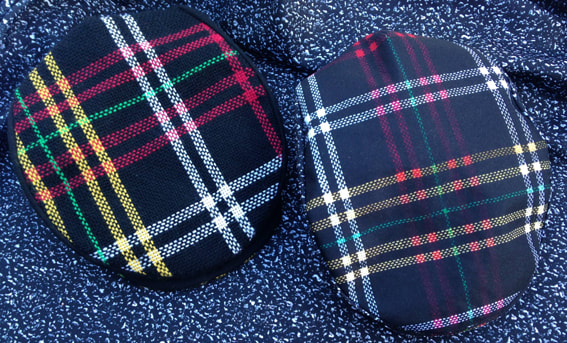
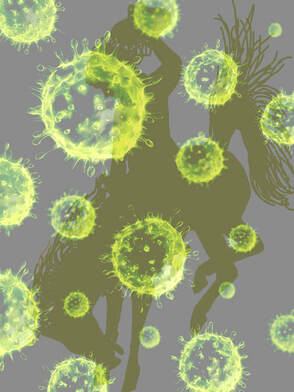
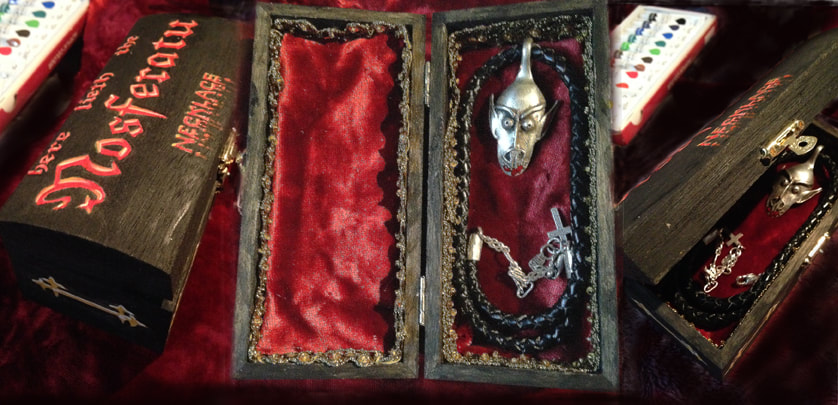
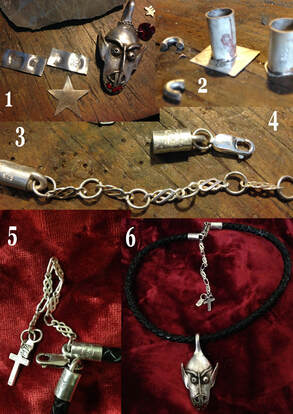
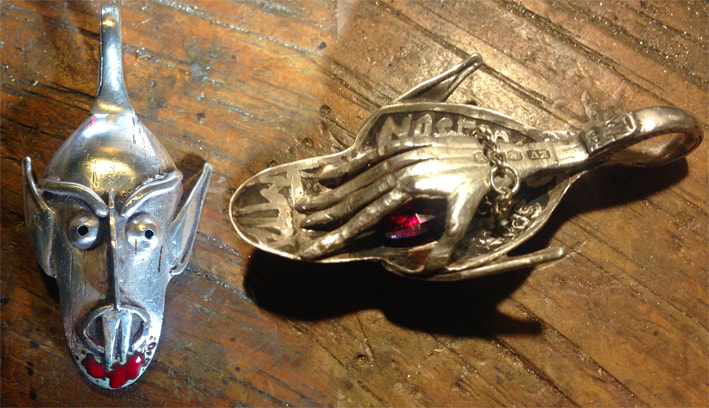
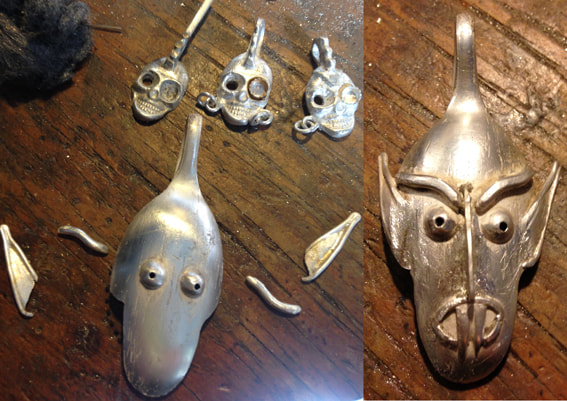
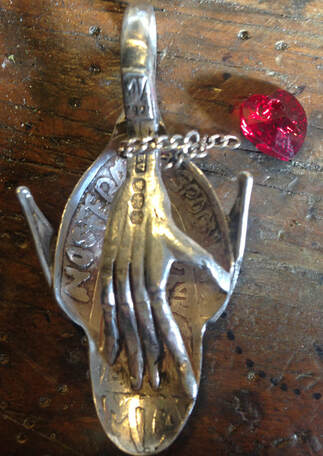
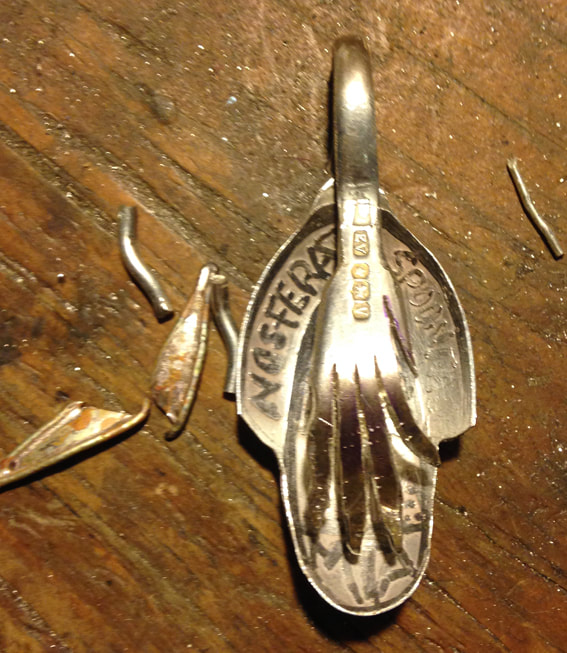
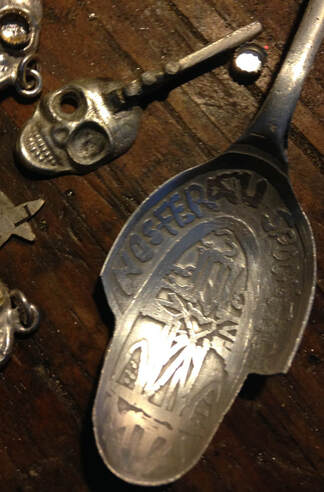
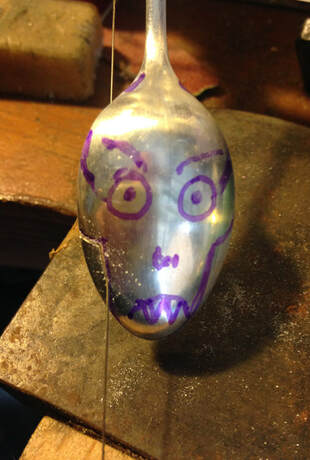
May 1st So as I mentioned in my blog last night; tonight I'm back to spooning, but guess who this time? When I folded the handle of the spoon over on this particular one; it reminded me of a large mohican hair style. With a face shaped like this spoon and a mohican hairstyle; one person sprang to mind, the fabulous Martin Degville of Sigue Sigue Sputnik. The first time Sigue Sigue Sputnik (who were formed by Tony James) appeared on Top of The Pops, I think every right-minded dad in the land choked on his tea. They were outrageous; colourful, over the top and edgy. A perfect combo. So begins, the making of the Sterling Silver Sigue Sigue Spoonface... The first stage was to etch the face. When I removed the spoon from the etching fluid I liked the effect, as I'd made it textured like the fishnet face mask he used to wear. I then cut out the mouth and sawed the individual teeth. (See above pic) The next stage was to punch his nose out (in a nice way); not too much though, as I wanted to get that stockinged mask effect. Tomorrow I will be attacking his back side; and FYI it will be getting quite naughty. If you wish to witness this, come again on the morrow.. ------------------------------------------------------------- April 30th I've been sewing in my sewing shed today, testing out polyester combinations of my Travelling the Road Tartan. I've also got some organic cotton lined up, and an exciting new lining and fabric design. I'm working on a shop page too for my website, and will be setting up an Etsy Shop. It's quite overwhelming knowing where to start; I've got so much completed work to list, and I keep putting it off until 'tomorrow'. Hopefully tomorrow on my blog, I will be spooning once again with the aid of a love missile. Shoot back here tomorrow to see a blast from the past, in silver. ----------------------------------------------------------- April 29th 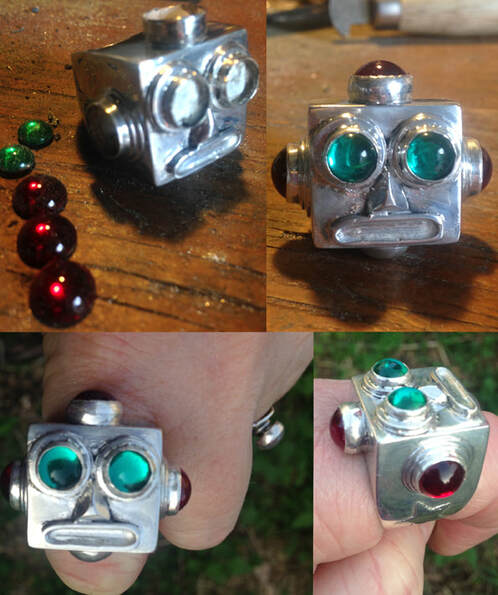 Now then; where were we? Ah yes. Ring a Ring a Robot. After soldering on all the silver pieces, I then set the Siam Glass cabochons. These really did bring the robot to life and I was very happy with the result. This is a very large (man-sized) ring, see pics left. It's a unique one-off, that is pretty out of this world too. I was trying to think of an apt punchline; but if you actually punched anything with this ring on it would leave a massive impression..... No need to do that though, just looking at it will also leave a massive impression!.. (If you are interested in buying this ring why not send me a D.M...not the shoe though)... ---------------------------------------------------- April 28th As I mentioned before; I challenged myself to make the robot ring, to test my skill at lots of soldering. The next step in the making of the piece was to cut out four smaller and four larger circles of silver from the scrap sterling ashtray. These I was going to use as the eye and ear bases, so the next step was to solder these to the ring. In the areas that are soldered, there will be a bit of solder residue left. These areas can be filed, or sanded back to leave a smooth surface. In between each solder, the ring was placed in jewellers pickle to remove oxidisation. Next I added the mouth and nose, and then made the collets (the gemsone holders) for the cabochons. I attached these too, and was beginning to feel quite pleased with myself. I'd managed to do all the solderes so far without any disasters. You could say that this piece was becoming my ring of confidence. Funky, chunky and punky...More tomorrow ... ---------------------------------------------------- April 27th...and a bit of the 28th.. Late night blogging tonight due to socialising. I will now attempt to type in a straight line. So......... the next stage in the making of the ring; ( after soldering the main joints), was to file and round the edges. I knew I would like to use foil backed pieces of glass for the lights, as I thought these worked well. (I think I may have had some costume jewellery as a child with this style of cabochon glass, and have always like it.) Before I started on the face though, I decided to add some silver stars to the shank of the ring. No particular reason why, I just like stars. I then cut out a circle of sterling silver from an old battered silver ashtray that I'd also cut the stars out of; domed the piece, and soldered it on to one of the surfaces . (See above pics) It was beginning to take shape nicely, so pop back tomorrow when it may be all about face... ----------------------------------------------------- April 26th I mentioned last night that I've started another silver 'Spoonface' spoon; but before I show you that, I thought I'd show you a huge robot ring I made recently, when I was lost in cyber space. I wanted to challenge myself with an extreme amount of soldering on one piece of jewellery; and I think it turned out that there were 32 soldered seams on the ring in the end; (which is a lot). One of the tricky things with lots of soldering on a piece of jewellery; is that every time you solder a new seam, you risk an old seam popping open. The whole affair can become one big balancing act. I love japanese tin plate robots of the 50's and 60's, and decided to base the design around one of them. First of all I cut out four pieces of 1mm sterling silver. The blue ink marks on the silver are remnants of potential etchings that I abandoned, which sanded off easily. I then soldered the pieces together. (See above pic). (I've just realised I'm making another character out of silver; maybe this is why I never get lonely, I can always 'make' new friends. Hmmm , I think I need to get out more.) I'll be back tommorrow with more data... ---------------------------------------------------------------- April 25th I'm glad I've turned the corner with this nusiance fluey cold thing that I've had, I find it really frustrating when I can't even make it 50 feet to my studio. Today I've been back at it thankfully. The fabric which I designed to look like a woven tartan has arrived and I've made a couple of flat caps out of it. I chose a polyester as it is light and comfortable for summer. Patterns can look completely different, when they are printed on different types of fabric. In the pic above the cap on the left is made from the hand woven merino wool that I wove on my loom; and the cap on the right, is a polyester twill made to look like the woven tartan. I'm quite pleased with the result; but will get some fabric printed in a cotton too, so that I can compare all three. I've also designed a lining for the hats, as I've decided this will complete the uniqueness of them. Today I started making a new silver Spoonface spoon, and will post more about that tomorrow. For now though, hats off to feeling better! ----------------------------------------------------------- April 24th I'm starting to feel a bit better tonight, so will be back to blogging tomorrow . I've been riding a beast called Virus, (see above pic) and I finally feel like I'm beginning to rein him in. Yeeeeharrr!!!! -------------------------------------------------------- April 20th No blog again tonight. Still sneezing and wheezing, it snot very pleasing... .------------------------------------------------------------ April 19th No blog tonight, due to sneezing , wheezing and freezing...B.R.B. ----------------------------------------------------------- April 18th I was beginning to tire; seven long days had passed, and I was starting to feel a little week.... Sleep had been evading me; and I felt that now the Prince of Darkness was nearing completion, it was time to lay him to rest. The making of the monster had left me short of funds, (I even tried to get a loan at the blood bank, but all was in vein). No; the way to press ahead now was to send him off in the modern manner, so I gave him The Works. I painted a fitting wooden casket for the necklace (see above pic). He is now laid at rest, waiting for someone to dig him. (Hell fire that was a bad pun?)... Which character should I feature next in the Silver Spoonface makeover?, I would be fascinated to hear your nominations? Vampire suggestions after midnight, don't Count.... Until next time....Mwwhhahahahaha.... ----------------------------------------------------------- April 17th The creature I had created had taken on a life of it's own by now; so I needed to restrain it with some kind of appropriate collar. The silver spoon itself was sizeable; so for comforts sake it required a large hanger, and to create a collar of 5mm or above out of silver, would have used a very large amount of material. Then I remembered the carriage driver with his whip; and thought how a leather (sorry to all the vegans out there) plaited thong, would make a very apt necklace for the pendant. This is not the type of thing you can buy in a normal jewellers shop and I knew I was going to have to construct one myself. First of all; I would cut out and stamp some pieces of silver, to make the chain ends. (The silver ends to the leather thong, see the rectangular pieces of silver in pic 1 ) . These I stamped with skulls. I then formed them into tube shapes and soldered them to flat pieces of silver as in pic 2. I cut off the excess silver and after soldering on the half ring ends, I filed and polished them. I wanted the extender chain to have a gothic look; and happened to have 5 chain links from a previous re-construction which fitted the look. I joined these with jump rings which I soldered and added a lobster claw catch. (Pics 3,4 and 5) I then found a sterling crucifix from a redundant necklace, which seemed to tie in very nicely with the overall theme. You may think the Nosferatu spoonface necklace is now complete but you are wrong, I still need to make the casket for it to lie in..... I may have to dig deep to create that....... ----------------------------------------------------------------------- April 16th Now that the main form of the face had emerged; I decided to take a stab in the dark and add some ruby red enamel, in a vein attempt to re-create an illusion of blood. I sprinkled enamel powder on the chin and fired up my torch. On the first firing I decided there was not enough glass powder to give the correct illusion; so I added more, then took the torch to his face once again. This time I was pleased with the outcome. I now felt happy with the look of Nosferatu, so I attached the ruby heart crystal to the chain and placed it in his grotesque hand. (See above pic) Tommorrow I will be going for the jugular and making a devilishly good hanging item to put the pendant on. (Let's hope it doesn't turn out to be a pain in the neck).... --------------------------------------------------------------------------- April 15th Continuing in the same vein as yesterday.... The monster I was creating was beginning to take shape. I decided I wanted him to have bulging; staring eyes, so I cut two silver circles and then punched his eyes out. I experimented with the face parts to work out where I wanted to attach them. Then I fired the ears and eyes onto the spoon, and shaped some large eyebrows too. I couldn't decide whether to give him a nose or not, but in the end I attached one. (After all; if he didn't have a nose how would he smell?......deadfully?). Next I textured the face; as I wanted him to look like he was in an old black and white film, then added the lips and fangs. Return again tommorrow to read all a bite the next chapter in The Nosferatu Spoonface...... –––––––––––––––––––––––––––––––––––––––––––––––––– April 14th So Day 3 and 'Count'ing; the blood curdling, silver spoon saga continues... It seemed necessary to finish off his backside before I started on his front; so I extended a couple of the fingers. (Sorry , I couldn't help myself). I carved and shaped his hand and soldered the fingers to the spoon. This created a pocket area and I decided I would place a blood red crystal heart in here. I soldered a bracelet chain onto the wrist and will attach the crystal to this, so that it can be lifted in and out of the hand when the piece is finished. I was beginning to feel that the end was nigh for the reverse of the spoon. So I attached the ears on the front, (as in the teasing pic above) and if you are daring enough to look at his hideously grotesque face, then tune in tomorrow for the next installment of The Silver Nosferatu Spoonface....... (Oh and there's only a few Designer scarves left that were handmade by me so.... Hop on over to the Traveller Tartan page to grab yours soon, before they disappear into the night! ----------------------------------------------------------------------- So the next chapter in my story of the making of the Nosferatu 'Spoonface' pendant goes like this... Using my saw, I started to cut away at his face mwwwhhhhahaha. The two pieces I removed; I would save to reattach upside down, to make into his ears. Before I started soldering things onto his face, I wanted to remove parts of the back of his head so I dropped his head in acid. The result is shown in the pic above right. The skulls that are also in the pic are silver skull pendants I've been making as well, out of recycled silver. For anyone who is familiar with the 1922 Gothic Horror film Nosferatu (and that would probably be most students who went to Art College in the 1980's); the vampire himself, has long twisted fingers. I wanted to capture this in the spoon; so I twisted the handle over the back of his head, and took my saw and created a hand and fingers from the end of the handle. (See pic top left, I've also added silver wire around the pieces I removed for the ears). The hand needs more work, but the basic shape is beginning to claw it's way out of the silver. I was tempted to put a pencil in the hand...why? So that he could draw blood....read the next batty installment on my blog tomorrow; and if you enjoy it please share it, fangs once again... ___________________________________ April 12th Whilst I've been pretty nocturnal; sewing and weaving in the night time and part of the day, I've also been playing with fire in the daytime in my workshop. As it's #whitbygothweekend this week, and as #whitby holds a dear place in my heart (having been brought up and schooled in Whitby). I decided to make one of my Sterling Silver pendant 'spoonface' necklaces based around Nosferatu (the early black and white film version of Dracula released in 1922). I've been re-purposing silver spoons into pendants for a while, and I like to look at a spoon and think who it reminds me of ? I thought it might be interesting to post a daily account this week; of the process of making the pendants, so the pic above is the initial rough sketch and first cut of the spoon. Tomorrow I will post the next stage...Fangs for looking... ______________________________________ April 11th 2019
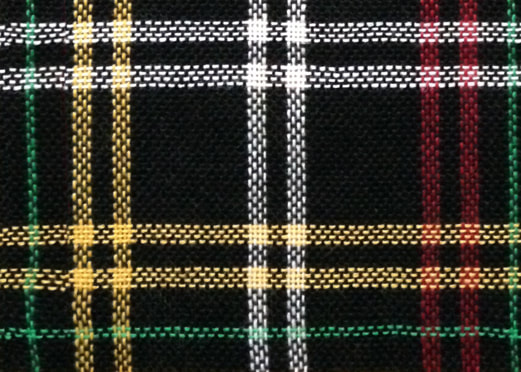
So with the changing season, I'm beginning to feel that it's time to 'spring' into action on the Internet. I know I've not been on here much recently, but I have been busy in my workshop. I've been living in a material world, but the fabric of my Universe has been just that...fabric. I've recently had a few messages asking about buying my Travelling the Road tartan by the metre. So I made inquiries about having the fabric woven on larger and more professional looms than mine. It seems the average price to have a bespoke tartan woven into a length is about £70 a metre for pure wool. Bearing this in mind; I decided to see if I could design a 'faux' tartan which has the look of a woven tartan but is printed onto a fabric. (I hate that word 'faux'; Trompe-l'oeil feels so much better and I want it to look like an optical illusion, as if you are actually looking at a woven tartan). I photographed a section of tartan that I'd woven into a length on my loom; the next bit was rather tricky. I had to find where the pattern repeats (a bit like where the pattern joins on wallpaper). I then had to put a grid over the pattern to ensure that the woven lines on the tartan would join up in the pattern. This was very time consuming and on top of this I had to correct the flaws in the image too. I didn't want the lines to be perfectly straight; more like a natural tartan, which made the job more complicated again. Anyway; I've finally finished it and I've sent the image off to the fabric printers to see what the finished effect looks like, fingers crossed. The image above is a close up of the print, so hopefully you can get a rough idea of the finished effect. I've also made some hats from the wool fabric I've woven on my loom, and I'll be listing them soon in my 'Lolly' Shop. Sweeeet!!!
2 Comments
|
Details
Lolly GoldingThe day to day life of a Somerset Artist Archives
March 2022
Categories
|

 RSS Feed
